

If you’re anything like me – bad with numbers and cannot be bothered with Excel formulas – you need to know this. This nifty little trick could be your lifesaver, and you can thank me later. With a click of a button, you can now turn your photos into Excel spreadsheets!
It’s Just Like Magic!
The magic button is named “Insert Data From Picture”, and it does exactly that. Not only does it work on your phone, but if you’re using a tablet, it works perfectly too! All you have to do is open up Excel on your gadget, and locate the “insert data from picture button”.

As long as your data is in rows and columns, the Excel app will automatically convert the image into editable table data. Data is sent to Excel’s online image-recognition engine before being converted into a table. What consists of data, you ask? It can be anything from numbers and words, even lists and recipe ingredients! The best capture of data will be from a piece of paper (printed), but it will also work on screens. With handwritten data, meh. It may or may not be accurate.
How Do I Turn Photos into Excel Spreadsheets?
Here’s a rundown:
1. In the Excel app, tap the New button at the top of the app to create a new file.
2. At the bottom of the app, tap the Insert Data from Picture button. If this is your first time using the tool, tap Allow to give Microsoft permission to convert the image to data using Microsoft’s online service.
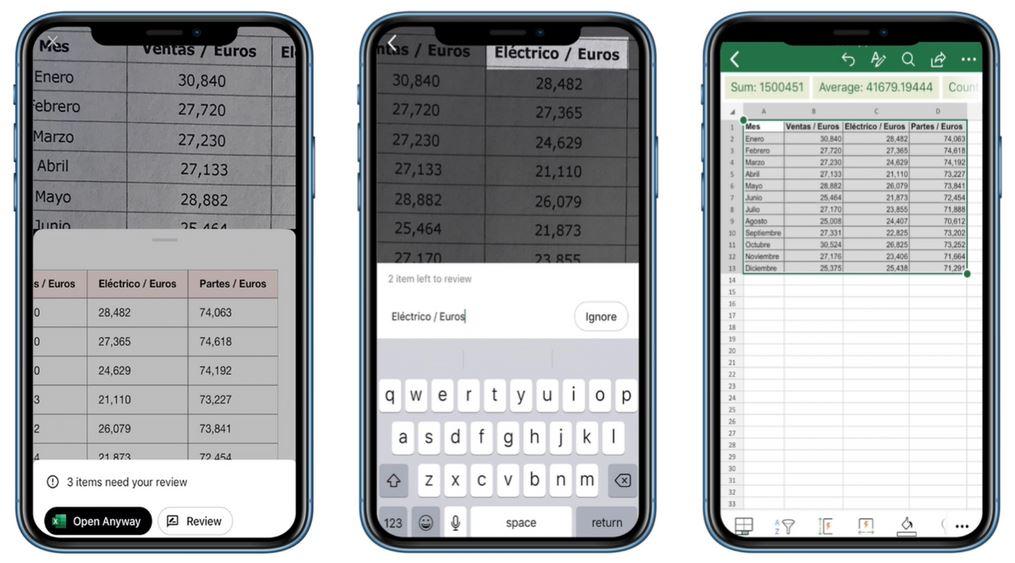
3. Position the red rectangle around the data you want to capture, and then tap the round Capture button. As with other technologies, sometimes it doesn’t agree with you on what you call data, so keep trying if you don’t get it the first time. Just make sure the red rectangle surrounds the data you want to get!
4. If you are happy with the captured image, tap the red check button to convert the data. If you’re not, tap the X and start again.
5. In a preview of the captured data, tap a red-highlighted cell and then tap Edit to enter missing information. Tap Done after each change. You can also tap unhighlighted cells to make corrections or changes.
6. Once you are happy with the data, tap Insert at the top to place the data in your workbook.
Note: Steps sourced from cnet.com.
And that’s it! No more poking at the keyboard for hours on end, trying to avoid going blind while the figures and word swim in front of you! Have you tried this before? What’s your experience like? Share it with us in the comments below!


